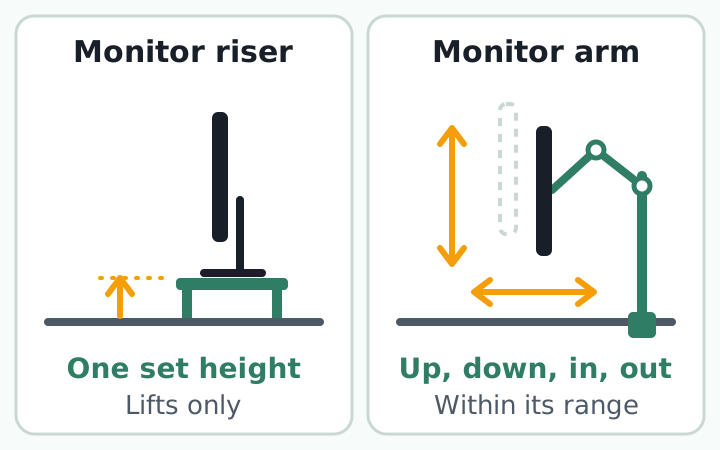
The monitor riser vs monitor arm question comes down to how often your screen needs to move. If you need a set amount of lift and the screen will stay put, a riser (also sold as a monitor stand) is enough. If you change height, distance, or angle during the day, need the screen lower than it sits now, or have a shallow desk, a monitor arm is the better fit.
Both tools chase the same target. OSHA says the top of the monitor should be at or slightly below eye level.1 Before you shop, find out how many inches you are short.
Monitor riser vs monitor arm at a glance
A riser is a small platform that sits under the monitor's own base. An arm replaces that base with a post and joints that hold the screen in the air. A riser needs no installation. An arm gives you far more range, but your desk and your monitor both have to qualify.
| Feature | Monitor riser | Monitor arm |
|---|---|---|
| Height | Fixed, or a few steps | Anywhere within its range |
| Lowering the screen | Not possible | Possible (check minimum height) |
| Distance and angle | Mostly unchanged | Adjustable along the arm's reach |
| Desk needs | A flat spot to sit on | Desktop thickness, rear edge, wall gap |
| Monitor needs | Base must fit on top | VESA mount holes, weight in range |
| Space under screen | Storage for a keyboard | Fully clear, base removed |
Monitor stand height: measure the lift you need in 3 minutes
Guidelines word it differently but point the same way: keep the top of the screen no higher than your eyes, with your gaze angled slightly down.
| Source | Screen height | Viewing distance |
|---|---|---|
| OSHA (US) | Top at or slightly below eye level; center 15 to 20 degrees below horizontal1 | 20 to 40 in (50 to 100 cm)1 |
| CCOHS (Canada) | Center about 15 degrees below horizontal; avoid looking up2 | About an arm's length2 |
| Cornell University | Eyes level with a point 2 to 3 in below the top of the monitor casing3 | About an arm's length3 |
| HSE (UK) | Top of screen level with eyes4 | About an arm's length4 |
To turn that into a number for your own desk, set your chair first, because the chair changes your eye height. Our guide to monitor, desk, and chair height covers that order.
- Sit back in your chair the way you normally work, feet supported, looking straight ahead.
- Measure from the desktop up to your eyes (A). Stand a tape measure next to the monitor and read the mark level with your eyes.
- Measure from the desktop up to the top of the visible screen, not the bezel (B).
- Subtract B from A. Raising the screen that much puts its top at eye level. Guidelines also allow slightly below, so treat the result as the most lift you need.
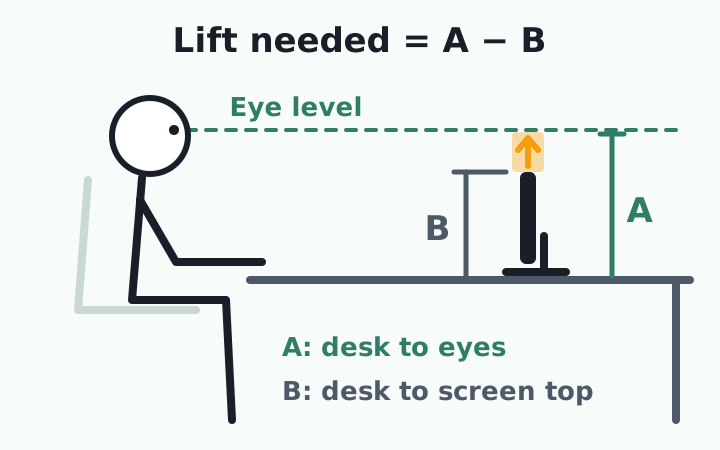
Say A is 18 inches and B is 15 inches. You need up to about 3 inches of lift. If the result is close to 0, you do not need to buy anything. If the result is negative, your screen is already too high. A riser cannot lower it. You need an arm that goes low enough, or a higher chair setting with your feet supported.1
Once the top is at eye level, the center drops into the recommended zone on its own. For a 16:9 screen viewed from 24 inches, our own calculation (half the screen height against the viewing distance, ignoring the bezel and tilt) puts the center about 14 degrees below eye level on a 24-inch monitor, 15 degrees on a 27-inch, and 18 degrees on a 32-inch. That is close to OSHA's 15 to 20 degrees.1
If you wear bifocals or progressive lenses, you look through the lower part of the lens, so set the screen a little lower than the number you calculated.12 With a tall monitor or one turned to portrait, CCOHS says the top should still not sit above your eyes.2
You can also check without a tape measure. Cal/OSHA's guide says you should be able to scan the screen from top to bottom using only your eyes. If you catch yourself nodding to read, the screen is too low.12
Before buying, stack books under the monitor for a few days. The stack that feels right is the height you need.
When a monitor riser is enough
A riser suits three situations: you need a fixed amount of lift and never move the screen, your desk cannot take a clamp (a glass top, for example), or you want to slide the keyboard underneath to clear the front of the desk. If your monitor's own stand adjusts for height, try that first.
- Height: match it to the number you measured. For an adjustable riser, check that one step lands close to it.
- Top surface: the monitor's whole base has to fit. A base that hangs over the edge wobbles.
- Load rating: add the monitor's weight to anything else you put on top.
- Clearance: if a keyboard goes underneath, the opening has to be taller than the keyboard.
- Depth: the riser should not push the screen toward you. OSHA's preferred viewing distance starts at 20 inches.1
When a monitor arm is worth it, and what your desk needs
An arm earns its place when the screen has to move: you alternate between sitting and standing, several people share the desk, or the screen needs to go lower or farther back than its base allows. OSHA's wording favors that kind of adjustability: monitor support surfaces should let you change viewing distance, tilt, and rotation.1 For the standing setup, see our standing desk guide.
Monitor height is best adjusted by a separate monitor pedestal rather than trying to move a whole worksurface.3
Alan Hedge, professor at Cornell University and author of its ergonomics workstation guidelines (revised 2015)
On the monitor side, look at the back panel. The VESA mounting standard defines the screw-hole interface on flat displays so that screens and mounts from different makers fit together.5 On the desk side, look at the desktop and what is behind it.
| Check | What to look for |
|---|---|
| Back of monitor | VESA mounting holes5 |
| Monitor weight | Weight without its stand is inside the arm's range, minimum and maximum |
| Desktop | Thickness within the clamp's range; not glass or hollow-core |
| Rear edge | No crossbar or cable tray blocking the clamp |
| Behind the desk | Enough gap to the wall for the clamp |
| Height range | Your measured height sits between the arm's lowest and highest positions |
Dual monitor arms make it easy to line up two screens of different sizes at one height. CCOHS applies the same height and distance rules to multiple monitors, with the one you use most directly in front of you.2 We cover angles in dual monitor arrangement.
What research says about screen height and your neck
We could not find a study that compares risers with arms directly. The research is about screen height, not hardware, and most of it comes from small lab experiments lasting an hour or two.
| Study | Setup | Finding |
|---|---|---|
| Turville et al., 1998 (US) | 12 people, 2 hours, screen center 15 vs 40 degrees down | At 40 degrees: more head tilt, higher activity in 6 of 10 muscles; 7 of 12 preferred 15 degrees6 |
| Sommerich et al., 2001 (US) | Eye-level, mid-level, and low placement | More muscle activity when low; mid-level preferred; performance dipped slightly at eye level7 |
| Seghers et al., 2003 (Belgium) | 89 minutes of work at 4 screen heights | Lower screens raised neck extensor activity, but muscle fatigue was rare8 |
| Kietrys et al., 1998 (US) | 27 computer users, screen raised 5 in | No change in the flexion moment on the neck over short periods9 |
Higher is not automatically better. Reviewing lab and field data, Psihogios and colleagues concluded that visual strain goes with higher placement and musculoskeletal strain with lower placement. They backed mid-level or somewhat higher placement as a rule of thumb, noting the best spot may be lower for some people or tasks.10
It is also unclear whether changing equipment reduces pain. A 2018 Cochrane review pooled 15 randomized trials with 2,165 office workers. Only one trial tested workstation adjustment, and it found no effect on upper limb pain or discomfort compared with doing nothing. The authors rated 14 of the 15 trials at high risk of bias and called for better studies.11
5 common mistakes with risers and arms
- Going too high. A screen that is too high causes more discomfort than one that is slightly too low.2 If the top line of text sits above eye level, Cal/OSHA's first remedy is to take the riser out from under the monitor.12
- Forgetting distance. A deep riser moves the screen closer. Keep it roughly an arm's length away.4
- Raising a laptop and still typing on it. Lifting the screen lifts the keyboard too. HSE advises a separate keyboard and mouse.4 See how to use a laptop stand.
- Checking only the arm's maximum load. Too heavy and the arm sags. Too light and it will not stay where you put it.
- Setting it once and never again. A new chair height changes your eye height. Measure A and B again.
If neck or shoulder pain, numbness or tingling in an arm or hand, weakness, or dizziness keeps coming back, see a doctor before you change your equipment. The measuring method here is a setup aid, not a diagnosis.
If you're leveling up your desk, start with screen height before the decor. Riser or arm, measure once with the method above on setup day, and you rarely need to touch it again.
Hardware sets the height. Posture is a separate job.
A riser for a fixed lift, an arm for a screen that has to move or come down. Either way, measure first. Three things to check at your desk today:
- Measure desk-to-eyes and desk-to-top-of-screen, and write down the difference
- Reach out and confirm the screen is about an arm's length away
- For an arm, check the desktop thickness, the rear edge, and your monitor's mounting holes
One problem remains. Even with the screen at eye level, your head drifts forward once you are absorbed in work, and you rarely notice when it happens. Cornell's guidelines also call for a brief rest break every 30 to 60 minutes.3 A good setup does not do that part for you. What you can do at your desk is build the habit of noticing when your head has moved forward and bringing it back.
RightPose AI is a desktop app for Windows and Mac. It uses the webcam on your laptop or monitor to check your posture briefly at a set interval (5 minutes by default) and shows an on-screen alert when it sees forward head posture. You register your own upright posture first, and the app judges against that baseline. It shows your image with joint lines so you can reset yourself. Camera images are processed on your device and never leave it.
If today is the day you set up your desk, register your good posture the same day.
RightPose AI is not a medical device. It is a habit tool that notices your posture and nudges you to reset and stretch.
FAQ
Is a monitor arm worth it?
It is worth it if your screen needs to move or come lower than its base allows, or if you need the desk space under it. If you only need a few inches of fixed lift and your desk cannot take a clamp, a riser does the same job for the height itself. Neither one has been shown to reduce pain on its own.11
Should I tilt my monitor back?
A little. OSHA suggests tilting the screen so it is perpendicular to your line of sight, usually no more than 10 to 20 degrees. Tilting it back too far can pick up glare from ceiling lights.1
How far away should my monitor be?
OSHA gives 20 to 40 inches from your eyes to the screen.1 CCOHS and Cornell both use an arm's length as a quick estimate, and recommend making text larger instead of moving closer if it is hard to read.23
Does a bigger monitor change the height rule?
The rule stays the same: the top of the screen should not sit above your eyes.2 A large screen often reaches that height on its own base, so measure before adding a riser. OSHA also notes that very large monitors increase the downward viewing angle to the bottom of the screen.1
References
- Computer Workstations eTool: Workstation Components, Monitors
- Office Ergonomics: Positioning the Monitor
- Ergonomic Guidelines for Arranging a Computer Workstation: 10 Steps for Users
- Working safely with display screen equipment: Good posture when using display screen equipment
- VESA Flat Display Mounting Interface (FDMI) Overview
- The effects of video display terminal height on the operator: a comparison of the 15 degree and 40 degree recommendations
- Effects of computer monitor viewing angle and related factors on strain, performance, and preference outcomes
- Posture, muscle activity and muscle fatigue in prolonged VDT work at different screen height settings
- The relationship between head and neck posture and VDT screen height in keyboard operators
- A field evaluation of monitor placement effects in VDT users
- Ergonomic interventions for preventing work-related musculoskeletal disorders of the upper limb and neck among office workers
- Easy Ergonomics for Desktop Computer Users
This article is for general information only and is not a substitute for medical diagnosis or treatment. If pain persists or worsens, consult a medical professional.